Wednesday, June 2, 2021

How to Add Arduino Mega 2560 Library to Proteus 8 | Easy | Fast

Hi guys, today I will share how to add the Arduino Mega 2560 library in Proteus 8. The Arduino Mega 2560 is based on the ATmega2560 and designed for projects that require more I/O pins, more memory, and RAM compare to other Arduino boards. 
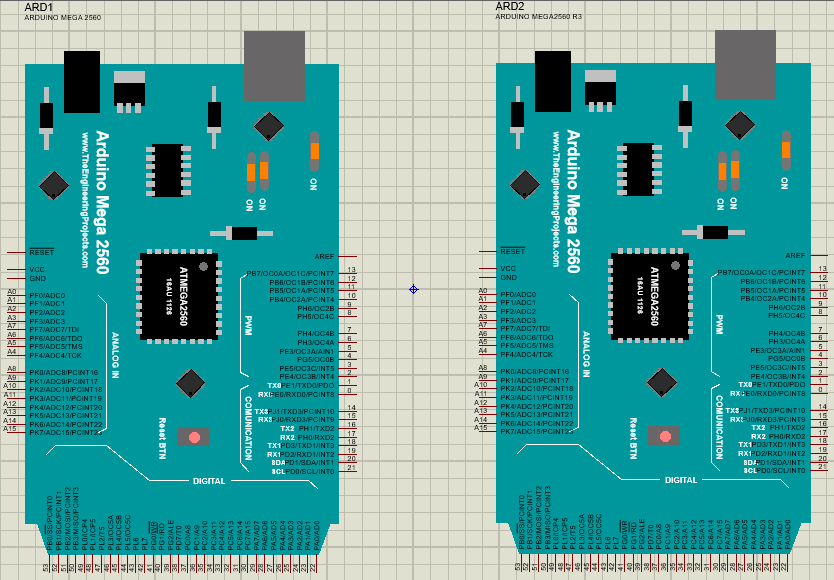

Specifications:

  • Microcontroller: ATmega2560
  • Operating Voltage: 5V
  • Input Voltage (recommended): 7-12V
  • Input Voltage (limit): 6-20V
  • Digital I/O Pins: 54 (of which 15 provide PWM output)
  • Analog Input Pins: 16
  • DC Current per I/O Pin: 40 mA
  • DC Current for 3.3V Pin: 50 mA
  • Flash Memory: 256 KB, of which 8 KB used by the bootloader
  • SRAM: 8 KB
  • EEPROM: 4 KB
  • Clock Speed: 16 MHz
  • LED_BUILTIN: 13
  • Length: 101.52 mm
  • Width: 53.3 mm
  • Weight: 37 g

Steps:
  1. Download the Arduino Mega 2560 library file at TheEngineeringProjects.com or click the link HERE. The download link will appear after 20 seconds.

  2. You will find two files on the downloaded zip file, named as:
    -ArduinoMega2560TEP.IDX
    -ArduinoMega2560TEP.LIB


  3. Extract these two files and place them in the Proteus libraries folder (C:\Program Files (x86)\Labcenter Electronics\Proteus 8 Professional\DATA\LIBRARY).

  4. Open your Proteus software and search for the Arduino Mega component. 


  5. Double click and drag to add to the Proteus 8 workspace.


Video:


If you have any suggestion, please write in the comment section. Thank you for your time 👷.

Tuesday, June 1, 2021

How to Interface | Use Infrared Sensor With and Without Arduino in Proteus 8

Hi guys, today I'm going to share how to use and interface the infrared sensor with Arduino and standalone in Proteus 8. This post is based on my previous post about adding the infrared sensor in Proteus 8. 


Components:

  • Infrared sensor
  • Arduino
  • Resistor
  • LED

Steps (Standalone):
  1. Open your Proteus software and add infrared sensor, resistor, LED and LOGICSTATE to the workspace.


  2. Connect GND, VCC, TestPin pins to the ground, power, and LOGICSTATE. Connect LED from pin OUT to ground through a resistor.


  3. Double click the infrared sensor and click the folder icon at the Program File box. Go to Local Disk (C:) > Program Files (x86) > Labcenter Electronics > Proteus 8 Professional > DATA > LIBRARY > InfraredSensorsTEP.HEX > Open > OK


  4. Start the simulation 

  5. If LOGICSTATE = 0 infrared sensor detects an obstacle or object. If LOGICSTATE = 1 infrared sensor does not detect obstacle or object

  6. Click LOGICSTATE to change the number from 0 to 1 and 1 to 0. LED ON when LOGICSTATE = 0 and LED OFF when LOGICSTATE = 1
Steps (Infrared Sensor with Arduino):
  1. Add  Arduino UNO R3 component to the workspace

  2. Change infrared sensor OUT pin to the pin 2 Arduino. Connect LED from pin 13 to ground through a resistor.


  3. Click HERE to download the Arduino project code. Extract the project code and verify

  4. Copy the Hex file, then paste it into the Proteus Arduino board.


  5. Start the simulation

  6. Click LOGICSTATE to change the number from 0 to 1 and 1 to 0. LED ON when LOGICSTATE = 0 and LED OFF when LOGICSTATE = 1

Video:


If you have any suggestion, please write in the comment section. Thank you for your time 👷.