
Today, I want to show you the full process of restoring the front crashed Perodua Axia SE 2017 car. You can find the service manual D88N (2017) from Shopee. For your information, I'm not a mechanic.

Step 1: Remove Battery Terminal
- Disconnect the negative terminal first, then the positive terminal.


Step 2: Remove Front Bumper
- Remove front bumper clips and bolts.

Remove left and right side bumper clips 
Bottom-side bumper clips 
Bumper Bolt No. 1 
Bumper Bolt No. 2 - Disconnect left and right front sensor connectors and fog lamp connectors.

Remove the left and right fog lamp sensor


Step 3: Remove Front Headlamp
- Disconnect left and right front headlamp connectors.

Remove left and right front headlamp bolts 
Disconnect left and right front headlamp connectors


Step 4: Fix Broken Part Headlamp
- Connect broken parts using hot air and soldering.

Solder the broken part 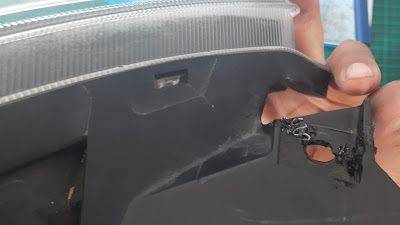
Add GI wire to strengthen the structure bonding


Step 5: Remove Radiator Support Hood
- Remove the radiator support hood and its accessories.

Remove the radiator support hood

Step 6: Remove the Front Bumper Reinforcement
- Remove hood lock support and front bumper reinforcement.


Step 7: Remove Right Headlamp Panel
- Remove the right headlamp panel and its accessories.

Remove top bolts 
Remove bottom bolts


Step 8: Install Right Headlamp Panel
- Install the right headlamp panel and its accessories.

Install bottom bolts 
Install top bolts


Step 9: Remove Front Bonnet
- Remove the front bonnet and detach the front bonnet clips.

Remove front bonnet 
Detach front bonnet clips using a plier or pry tool 
Remove the front bonnet hood insulator.


Step 10: Install Front Bonnet
- Install the front bonnet and attach the front bonnet clips.

Install front bonnet 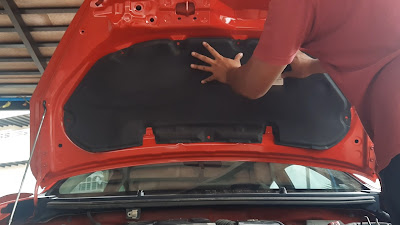
Installfront bonnet hood insulator 
Attach front bonnet clips


- Install front bumper reinforcement.


Step 12: Remove Condenser and Radiator
- Remove the condenser by removing the bolts, discharge hose, and liquid tube no 1.

Remove the discharge hose of the condenser 
Remove liquid tube no 1 
Remove condenser - Remove radiator assembly with fan by removing cap and hoses (upper and lower).

Remove the cap and upper hose of a radiator 
Remove the lower hose of a radiator - Remove the reserve tank assembly and fan assembly with the motor.

Remove the reserve tank assembly 
Remove fan assembly


The link tools and components replacement I used in this video are listed below:
Tools/Components/Items (Shopee):
Tools/Components/Items (Lazada):
- Screwdriver Set
- Plier Set
- Cable Tie
- Spanner Set
- Soldering Iron (ZD90S)
- Radiator Axia 2017 Auto (OEM)
- Condenser Tube Axia (OEM)
- Liquid Tube Axia No. 1 (OEM)
- Seal Plate/Cooling Packing No.1
- Radiator Support Upper
- Head Lamp Panel RH/LH
- Fender/Bumper Clip
Video:
That's all from me. If you have any suggestions, please write in the comment section. Thank you for your time 👷.


