Thursday, August 24, 2023

Upgrade Your Lamp with AS-10 Photo Sensor: DIY Lighting Automation

The AS-10 Photo Sensor in modern technology is a testament to the innovation that simplifies our lives. Imagine having the power to transform your humble lamp into an innovative, automated lighting solution. In this comprehensive blog post, we're delving into the world of lighting automation as we guide you through the step-by-step installation of the AS-10 Photo Sensor. Say goodbye to manual lamp control and hello to a new era of convenient, energy-efficient lighting!

Thumbnail photo sensor wiring

Chapter 1: Unveiling the AS-10 Photo Sensor

The AS-10 Photo Sensor, an engineering marvel, offers a revolutionary way to control your lamp's illumination. Designed to adapt to changing light conditions, this sensor ensures that your lamp switches on at dusk and off at dawn without your intervention. But how does it work its magic? Let's explore the intricate yet surprisingly simple wiring that powers this innovation.

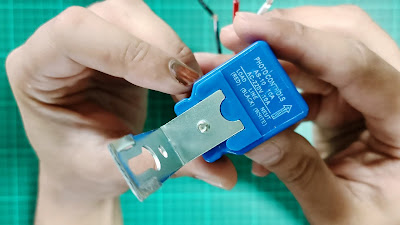
Review the AS-10 photo sensor.

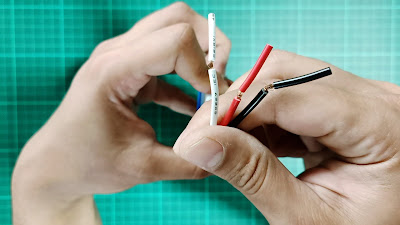
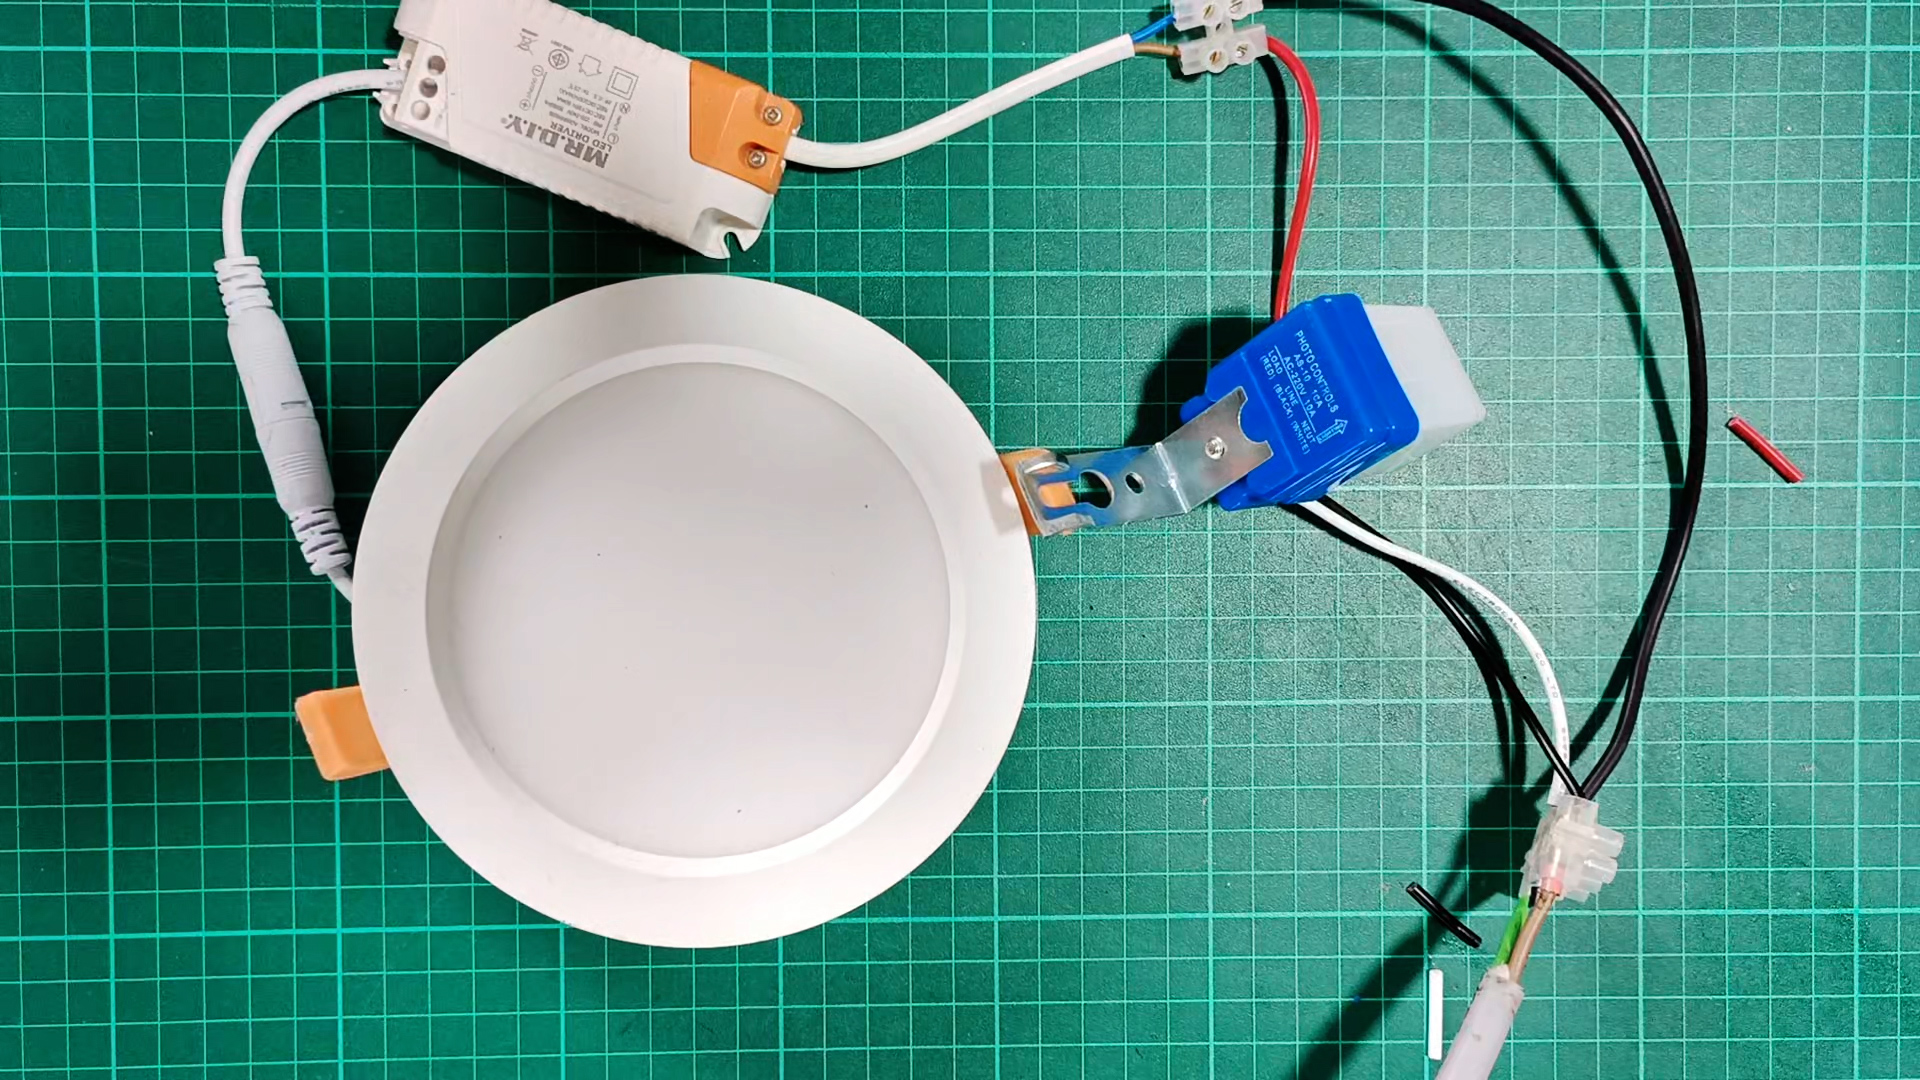
The AS-10 Photo Sensor comes with three wires: red (load), black (line), and white (neutral).

Chapter 2: Connect Wires

Connect the red wire from the AS-10 Photo Sensor to your lamp's live wire (often brown). The black wire from the sensor connects to the power supply's live wire, while the white wire links the sensor to the power supply's neutral.

Connect the red wire from the AS-10 Photo Sensor to your lamp's live wire (often brown)

The black wire from the sensor connects to the power supply's live wire.

The white wire links the sensor to the power supply's neutral.

The neutral wire from the power supply is connected to the lamp's neutral wire, typically identified as the blue wire.

Ensure each connection is well-secured. 

Chapter 3: Witnessing the Automation

With the AS-10 Photo Sensor installed, you can experience the magic. Turn on the power supply, and watch as the sensor's automatic control takes charge. 

Cover the sensor to simulate darkness, and your lamp will illuminate.

The lamp will gracefully turn off as daylight breaks or the sensor is uncovered.

The link tools and components replacement I used in this video are listed below:

If you've found this guide insightful, use more helpful content. Subscribe to our channel for in-depth tutorials, innovative insights, and technology explorations that empower you to make the most of modern advancements. Together, let's transform the way we experience our everyday environments!

Saturday, August 19, 2023

Epic PC Upgrade: Transforming My Old Desktop into a High-Performance Marvel

In a world where technology evolves at lightning speed, it's no surprise that our faithful old desktops can sometimes fall behind the curve. But fear not, for today, we embark on an epic adventure into PC upgrades. Join us as we transform a dusty, outdated machine into a cutting-edge powerhouse ready to tackle any task.

Before and after the upgrade.

Chapter 1: Disassembly Magic

Our journey begins with a curious mixture of excitement and apprehension. As the clock ticks and the camera rolls, we don our tech wizard hats and delve into the world of disassembly magic. Each component is about to undergo a makeover, and the anticipation hangs like a prelude to a grand spectacle.

PC desktop side view.

Remove all components.

Remove the front casing.

Disassemble the graphic card.

Chapter 2: Cleaning the Canvas

A thorough cleaning is necessary before the fundamental transformation begins- a necessary ritual. Dust, the silent enemy of performance, is banished with precision. A clean slate emerges as the canvas upon which we shall paint our technological masterpiece.

Cleaning the PC casing.

Cleaning the PC's PSU.

Cleaning the graphic card.

Chapter 3: Unveiling the Heroes

With the stage set, it's time for the grand reveal of our upgrade heroes. First in line is the ASUS TUF Gaming B5550M-Plus Wifi II Motherboard, a foundation upon which our dreams of power are built. Next, the Hyper 212 RGB Black Edition CPU Air Cooler is ready to ensure that temperatures remain controlled even during the most demanding tasks. And let's remember the AMD Ryzen 7 5800X, a processor that promises to breathe new life into our system.

ASUS TUF Gaming B5550M-Plus Wifi II Motherboard.

Hyper 212 RGB Black Edition CPU Air Cooler.

AMD Ryzen 7 5800X.

Corsair Vengeance LPX DDR4 3600 C18 2x16GB RAM.

Chapter 4: Assembling the Puzzle

Piece by piece, the puzzle of transformation takes shape. Corsair Vengeance LPX DDR4 3600 C18 2x16GB RAM modules slot into place, followed by the Samsung 990 Pro NVMe PCIe M.2 1TB, a storage solution that boasts speed and efficiency. The guardian of coolness, the CPU cooler, is carefully mounted to ensure that our PC remains frosty under pressure.

Install CPU air cooler.

Tighten the CPU air cooler.

Install SSD Samsung 990 Pro NVMe PCIe M.2 1TB

Install Corsair Vengeance LPX DDR4 3600 C18 2x16GB RAM modules slot into place.

Install front fan PC casing.

Install exhaust fan PC casing.

Apply the thermal paste on the graphic card.

Place the motherboard in its place.

Connect all the connections to the motherboard.

Install graphic card.

Chapter 5: Disassembly Magic

The roadblock emerges as the Hyper 212 RGB Black Edition CPU Air Cooler is found to be slightly too large for our case. But in the world of upgrades, challenges are merely opportunities for innovation. Modifications are made, and the cooler fits snugly, reminding us that sometimes a little tweak is all it takes to make something truly remarkable.

The casing cannot close.

Modified the casing

Chapter 6: The Climax

As the final pieces fall, our upgraded PC takes shape. The ASUS TUF Gaming motherboard finds its home, and the loyal graphics card receives the care it deserves. The culmination of our efforts is a sight to behold, a true testament to the magic of upgrades.

Casing after modification.

Back view of the PC.

Front view of the PC.

Chapter 7: The Moment of Truth

With bated breath, we power up the machine. The fans whir to life, and the screen illuminates with promise. Benchmarks are run, and the numbers on the screen tell a tale of triumph. Once a humble workhorse, our PC has ascended to the ranks of a true powerhouse, capable of unimaginable feats before the upgrade.

Test result from the benchmark.

Test result from benchmark (continue).

The link tools and components replacement I used in this video is listed below:

Lazada:

  1. Screwdriver Set
  2. Plier Set
Aliexpress:
  1. Screwdriver Set 
  2. Plier Set

Video:


As our journey ends, we see the power of upgrades. An old computer is reborn like a phoenix. The ASUS TUF Gaming B5550M-Plus Wifi II Motherboard, the Hyper 212 RGB Black Edition CPU Air Cooler, the AMD Ryzen 7 5800X, and other parts have strengthened the system. If you're excited by change and potential, remember to subscribe, like, and share with tech fans. Upgrading isn't just about better performance—it's about embracing the future in our fast-changing world.

Tuesday, August 1, 2023

DIY Solar LED Outdoor Light Repair: Not Turning ON During Nighttime

Are you facing an issue with your LED solar outdoor light not turning on during nighttime? Don't worry; we've got you covered! In this blog, we will guide you through a simple DIY repair to restore the glow to your outdoor nights.

The battery is not connected to the power supply

Step 1: Accessing the Internal Components

  1. Remove the four screws holding the solar cover in place to begin the repair. This will grant you access to the inner workings of the LED solar outdoor wall light.

    It's not turning ON when the solar is shaded.

    Removing screws

Step 2:  Identifying the Issue
  1. Check for a loose wire at the battery connection. This could be the reason behind your LED light's nighttime inactivity.

    The battery wire negative is not connected.
Step 3: Temporary Connection and Testing
  1. Temporarily reconnect the loose wire to the battery terminal and test the LED light while shading the solar panel. If it lights up, the flexible wire is likely causing the issue.

    LED turning ON
Step 3: Ensuring a Permanent Fix
  1. To guarantee a lasting solution, secure the wire using soldering. This will provide a reliable connection, preventing future interruptions to the LED light's functionality.

    Solder the wire to the negative battery
Step 3: Reassembling the Components
  1. After soldering the wire, reassemble the LED solar outdoor wall light. Place the solar cover back in position and fasten all four screws tightly to ensure a snug fit.

    Fix the battery back to its original place.

    Tighten the screws
Step 3: Final Testing
  1. Test the LED light once more to confirm it activates properly during nighttime hours. Now, you can enjoy well-lit evenings in your outdoor space once again!

It works like a charm!

The link tools and components replacement I used in this video are listed below:

Video:


With these straightforward steps, you can easily repair your LED solar outdoor wall light and make the most of your outdoor living spaces at night. Consider showing your support by subscribing to our channel, liking the video, and sharing it with others who might find it helpful. Your support means the world to us! Happy DIYing, and enjoy the beautifully illuminated nights ahead!