Today, I want to show you how to troubleshoot and repair a noisy ceiling fan. In addition, I will service and deep clean this fan. When you hear humming or squeaking coming from your ceiling fan, it's usually because some of its components are faulty.

Step 1: Diagnosis fan
- If your fan makes a squeaking noise, then your fan maybe have bearings failure.
- For humming problems, It can be faulty board or part installation (fan covers).
- I will show you how to repair squeaking and humming noise problems in this post.

Step 2: Removal cover
- Turn off the fan switch. It is recommended to isolate all power supplies from your house for safety reasons.
- First, open the fan rod cover and remove the wiring supply from the terminal block.
- Cut cable tie and remove safety wire and cotter pin.
- Remove nut and bolt from fan rod, then remove the fan.
- Remove another cotter pin, nut, and bolt, then remove the fan rod.
- Remove the top cover (3 screws).
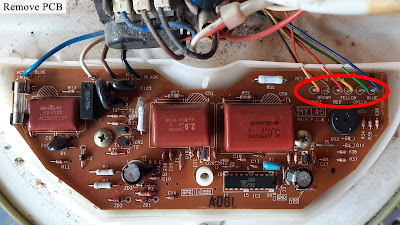
- Remove main PCB cover and secondary terminal block wiring.
- Remove 4 fan blades (2 screws each blade).
- Remove PCB wiring using soldering iron.
- Remove terminal block, PCB cover, safety wire, and bottom cover (3 screws).
- Remove IR cover (1 screw behind the main rod fan).
- Move the wiring into the main fan rod to remove the inner top cover.
- Remove the secondary inner top cover (3 screws). Tap a little bit to lose it, then you can easily remove the inner top cover.
- Remove the plastic inner bottom cover (4 screws).
- Remove the metal inner bottom cover using 3 jaws puller.
- Remove bottom and top bearing using 2 jaws pullers.
- Remove PCB from IR PCB cover.
- Remove earthing wire from the fan rod.
- Clean and rinse covers. For electronics parts, just use a brush and wipe any dust accumulated.


Step 2: Installation
- If your fan has a squeaking noise problem, replace or lubricate both bearings. Recommend replacing the bearing for good practice. The picture below shows the comparison between old and new bearings.
- Install the fan parts and components in reverse order of removal. Note: Put some grease on the bearing.
- If your fan has a humming noise problem, usually caused by a capacitor defect or not installing fan covers.
- Check capacitance for these 4 capacitors using a multimeter or ESR meter. Make sure the capacitance is within the range.
- In my case, I need to replace 0.1 uF because the tolerance capacitance value is out of range.
- Continue to install the parts and components in reverse order of removal.
- Lastly, on the main power supply and switch on the fan.
- No more noise coming from a fan.


The link tools and components replacement I used in this video are listed below:
Tools/Components/Items (Shopee):
Tools/Components/Items (Lazada):
- Screwdriver Set
- Plier Set
- Cable Tie
- 2 Jaws Puller (4 Inches)
- 3 Jaws Puller (6 Inches)
- Spanner Set
- Solder Core Wire (0.6mm)
- Solder Flux
- Tweezer ESD
- Soldering Iron (ZD90S)
- Multimeter UNI-T UT210E
- Heat Shrink Tube
- Bearing (6203ZZ)
Video:
That all from me. If you have any suggestions, please write in the comment section. Thank you for your time 👷.