
Today, I will share the installation and setup of the thermal printer XP-460B. Direct thermal printers are mostly used to print items such as receipts and shipping labels. It is cost-effective since the printer does not require ink or ribbon to print out the label/sticker.

Specifications:
- Printer Model: XP-460B
- Resolution: 203DPI
- Printing method: Direct Thermal
- Max.print speed: 127 mm/s
- Max. print width: 108 mm
- Max. print length: 2286 mm
- Media type: Continuous, gap, black mark,fan-fold, and punched hole
- Enclosure: Double-walled plastic
Steps (Set up printer)
- The package includes a courier flyer bag, A6 label, sticker, OTG cable, printer cleaning pen, user manual, XP-460B printer, charger, and printer accessories inside the box.

Unboxing 
XP-460B printer 
Printer accessories - Connect the power cord to AC/DC adapter.

- I need to use an adapter from type I to type G since my power socket is type G.

- The USB cable is used to connect the printer to the PC.

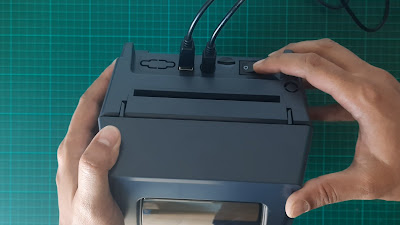
- Connect USB (printer to PC) and power supply.

- Insert the label spindle into a paper roll.


- Open the printer top cover by pushing upward the top open levers (orange) located on both sides of the printer.

- Remove sample paper.

- Place a roll of paper into the internal paper roll mount.
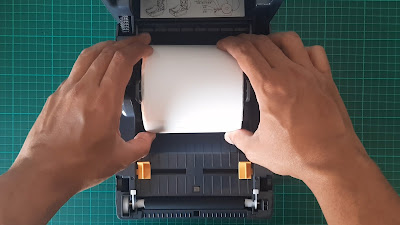
- Feed the paper, printing side up through the label guides, and place the label over the platen. Adjust the label guides in or out to slightly touch the edges of the label backing.

- Close the top cover, and make sure the cover locks levers securely.

- Turn ON the power switch located at the back of the printer.
- Press the FEED button, and it feeds the label to the beginning of the next label. If the gap between paper/and sticker is out of range, you need to calibrate the printer. In my case, it is working normally.


Steps (Print from PC)
- Insert the USB to the PC then the window will set up a device automatically.
- Download the latest version of the XP-460 printer driver by seagull scientific. Click HERE to download.

- Install the driver.

- Open your AWB pdf file > click the print icon > change the printer to the Xprinter XP-460B.

- Go to properties > select 4 x 6 on the stock column > press OK.

- Lastly, go to the page size and handling column > select a fit or actual size > press Print.

- The printed paper is out from the feed.


Steps (Print from Phone)
- Install the Print Label software from the play store to print from the phone.

- Open print label and click Allow if Print Label asks to take pictures, record video, and ask to turn on Bluetooth.


- Next, go to Settings > Conections > Bluetooth > Pair the devies with the printer symbol XP-460B > Enter PIN "0000" > click Pair.


- Back to Printer Label and click ≡ > Permissions > File and media > Allow management of all files > Allow.


- Click ≡ again and select your AWB pdf file from your phone.


- Click PRINT > Connection status > select XP-460B.


- Click PRINT again, and OK.

- The printed paper is out from the feed.


The tools/components I used in this post are listed below:
Shopee:
Lazada:
Aliexpress:
Video:
If you have any suggestions, please write in the comment section. Thank you for your time 👷.
No comments:
Post a Comment