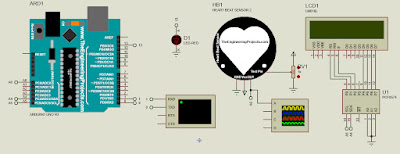
Today, I will share a simple heart rate or pulse rate monitoring system using Arduino. The sensor is used to measure a person's heartbeat rate or heartbeat count. The library I used for this project is from PulseSensor Playground. Download the project, library, and simulation files below.
How its work?
- The sensor will sense the heartbeat and display it on the serial communication and LCD.
- Display "A Heart Beating!" and "BPM: ". The data update automatically when a beat is detected.
- Blink LED on PIN 13 when a beat is detected.
- Change the heartbeat pattern by increasing or decreasing the variable resistor.
Related Post:
References:
Components:
- Heart Beat Sensor V2
- Variable Resistor
- Oscilloscope
- LCD 16 × 2 I2C
- Arduino UNO
- LED
Steps
- Open Proteus 8 software and add ARDUINO UNO R3, HEART BEAT SENSOR 2, LED-RED, POT-HG, LM016L, VIRTUAL TERMINAL, OSCILLOSCOPE, and PCF8574 to the workspace.
- Wiring all the components according to the figure below.
- Double click the HEART BEAT SENSOR 2 and click the folder icon. Go to Local Disk (C:) > Program Files (x86) > Labcenter Electronics > Proteus 8 Professional > DATA > LIBRARY > HeartBeatSensorTEP2.HEX > Open > OK.
- Download the LIBRARY and PROJECT file. Extract the project file and verify.
- Copy the Hex file, then paste it to the project file Arduino board.
- Start the simulation and set the time scale of the oscilloscope to 0.4μS. The LCD and serial communication will display "A Heart Beating!" and "BPM: " when the heartbeat is detected.
- The heartbeat rate (BPM) will increase if the resistance value decreases.
- The heartbeat rate (BPM) will decrease if the resistance value increases.
Video:
If you have any suggestions, please write in the comment section. Thank you for your time 👷.


No comments:
Post a Comment